Cold weather outdoors means it’s time to get crafty indoors. We’ve got step by step instructions with photos on how to make 3D snowflakes below. When the weather gets cool, the kids and I like to tackle snowflake crafts.
We were thrilled to master the art of making the 3D Paper Snowflake. 3D Paper Snowflakes look super cool and are actually quite simple for children to make with the help of an adult once you know the step by step instructions.

I promise you’ll find these instructions very easy to follow when you look at them with the photographs included for each step. It’s somewhat hard to believe creating a beautiful 3D snowflake could be so simple, but once you know the instructions it really is easy to craft your own 3D snowflake.
How to Make 3D Snowflakes
Here’s our tutorial and instructions for how to make a 3D paper snowflake with photos so you can really get a feel for the process. It is easy once you know how to do it, but as you can tell the snowflake is complex so it does take a dose of patience along with the knowledge of the right steps.

My 7 year old was able to help me make this and she was fascinated by the process and very proud of her final result. My son just turned 5 and he definitely did not have the patience to help, but he was totally wowed by our 3D snowflake masterpiece.
Here’s what you’ll need: 6 Pieces of White paper, and Scissors, Scotch Tape. A mini stapler is optional for connecting the snowflake together however, we used scotch tape for our version showed here.
Step by Step instructions on how to make a 3D Snowflake with Photos
Step 1:
Cut each of your 6 pieces of paper into a Square. Create a square by folding it like this and then cutting off the scrap. You’ll do the below steps 6 times to create the 6 “arms” of your snowflake.

Step 2:
Fold your square diagonally so that it is now a triangle. Cut along the folded line approximately 6 times like this.

Step 3:
Position your snowflake like this as you prepare to fold the pieces together to get your 3D look.

Step 4:
Begin to fold and tape your snowflake. Start from the inside by taking the 2 corners along the fold line and tape them together. Tip: Remember to always work from the fold line when bringing pieces together.

Step 5:
Flip your snowflake over. Next, repeat the above process of folding the next 2 corners along the fold line and tape them together.


Step 6:
Flip your snowflake over again. You will repeat the folding, taping, and then flipping the snowflake over to repeat the process until complete.

Step 7:
After you have all 6 sides made, you are ready to connect all the pieces to complete your 3D snowflake.
Start with 2 of your individual “arms” or pieces that you made. Now, you will connect them in the center like this with a small piece of scotch tape – or if you have a mini stapler that works well too.

Step 8:
Next connect the 2 “arms” of the snowflake together at their tips with scotch tape to form the CENTER of what will be your 3D snowflake.

This is a great time for kids to help with the process. Kenzie loved putting it all together with me.
Step 9:
Continuing adding sides of your snowflake to the main body of the snowflake until it is complete. Tip: Remember to tape each new arm in 2 places as you connect it to the main body of the snowflake. (Both in the center of the arm and taping the tip of the snowflake to all the other pieces at the new CENTER of your 3D snowflake)
Our snowflake has 6 sides but you could make a bigger one if you’d like, however, we find that 6 works great since it is more symmetrical.

How Long Does it Take to Make a 3D Snowflake?
Obviously depending on the age of the child making it and the patience involved, the time to create can really vary! Definitely think 10-15 minutes to complete an entire snowflake if you haven’t already done prep work.
How to Make a 3D Snowflake Fast
For younger kids making 3D snowflakes, you might want to be able to expedite the process since we know patience for little ones can come in short supply!
Prep Steps 1-3
You can help your child or a group of children by prepping in advance and completing Steps 1-3 for them … this would be simply making all the cuts in the piece of paper for each “Side” of the snowflake by doing steps.
Prep Steps 1-4
If you prep Steps 1-4 all the kiddos need to do is attach each “arm”, “side” or “wing” of the snowflake to complete the entire snowflake.
Where to Display Your 3D Snowflake
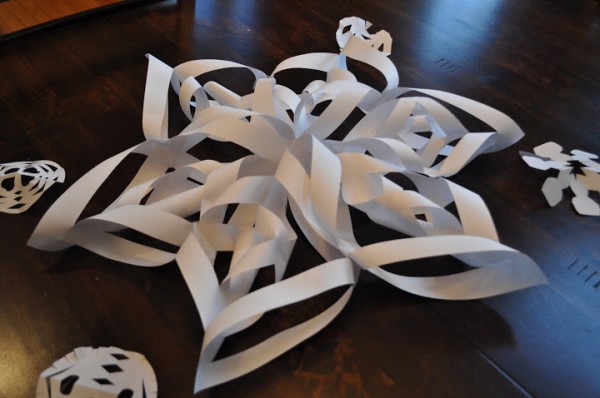
After your done your masterpiece, your snowflakes will look great hanging from a chandelier or as a centerpiece at the kitchen table surrounded by regular paper snowflakes.
Here’s a 3D snowflake as a centerpiece surrounded by traditional paper snowflakes. Cute!

Below we have a giant 3D snowflake hanging from our kitchen chandelier.


More Winter Crafts for the Kids
If you are looking for some more inspired winter craft ideas, check out some of our Classy Mommy favorites for kids.
How to Make a Puffy Paint Snowman with Shaving Cream and Glue – Fun, Easy & Cute!
Popsicle stick Snowflakes – Easy with snowflake stickers, popsicle sticks, and glue!
Great indoor craft for winter! I’ll have to pin this and save it for when my little one is old enough. Thanks for sharing!
I love it
OH They are SO pretty!! Bookmarking this for when my kids get a little older
Thabks for posting!
Now you are going to have to make me go off and look AMAZING in front of my kids and husband…
SOOO cute and looks easy too!!
My daughter is going to go crazy over these! Can’t wait show her tomorrow:) My home will be FILLED with 3D snowflakes!
WOW !!!! They are so cool. Kenzie looks so excited she accomplished such a beautiful snowflake.
Those are beautiful! I am sure my girls would love to give those a try. Job well done.
Howdy, i read your blog occasionally and i own a similar one and i was
just curious if you get a lot of spam remarks? If so how do you reduce it, any plugin or anything you can
recommend? I get so much lately it’s driving me mad so any help is very much appreciated.
82448 47192brilliantly insightful post. If only it was as easy to implement some of the solutions as it was to read and nod my head at each of your points 867768
I liked this so much. I might even bookmark this to revisit.
Thank you.
They also market pairs of footwear that are
tough to find. From now until August 31, 2011, they are
running a 20% off sale on a purchase of $100 or more.
The designers pay more attention to children’s childishness
and health.
This paragraph is really a nice one it assists neew internet viewers, who are wishing for blogging.
Today the whole family is putting the Christmas tree up and the ornaments and we are so excited to do the 3D snow flakes in different colors thank you for this creative idea
like i
In the event you need a good approach to serve people, you could enroll in a real consumer debt internet affiliate platform in addition to aid clients get rid of debt whilst you earn some good fees.
Howdy would you mind stating which blog platform you’re working with?
I’m planning to start my own blog in the near future but I’m having
a tough time choosing between BlogEngine/Wordpress/B2evolution and Drupal.
The reason I ask is because your design seems different then most blogs
and I’m looking for something completely unique. P.S Sorry
for getting off-topic but I had to ask!
I am sure this piece of writing has touched all the internet
visitors, its really really fastidious paragraph on building up new web site.
Your fridge should be stocked with supplies like cream, sandwich meat, and easy-to-prepare meat like chicken, steak, sausage, and hot dogs.
My grandparents and most of my uncles and aunts
had passed away and there was simply no other place for
me to live. for Central Post Office: Request for moving kits and they
can get a coupon in the envelope.
You could definitely see your skills in the article you write.
The world hopes for more passionate writers like you who aren’t afraid to say how they
believe. At all times follow your heart.
Thanks for the auspicious writeup. It actually was a leisure account it.
Glance advanced to more introduced agreeable from you!
However, how could we be in contact?
It’s awesome to visit this web site and reading the views
of all colleagues regarding this article, while I am also eager of
getting knowledge.
Every weekend i used to go to see this web page, as
i want enjoyment, for the reason that this this website conations actually nice funny stuff too.
I think that is one of the such a lot important information for me.
And i’m happy studying your article. But want to commentary on some general issues, The site
taste is great, the articles is really excellent : D. Good
task, cheers
It’s actually very difficult in this full of activity life to listen news on TV, therefore I just use the web for that reason, and get the hottest news.
It’s awesome to pay a quick visit this web site
and reading the views of all mates on the topic of this
article, while I am also zealous of getting know-how.
Whats up are using WordPress for your site platform?
I’m new to the blog world but I’m trying to get started and create my
own. Do you need any html coding expertise to make your own blog?
Any help would be greatly appreciated!
I think this is among the most significant info for me.
And i’m glad reading your article. But should remark on some general
things, The web site style is ideal, the articles is really great :
D. Good job, cheers
Hi to every one, it’s actually a pleasant for me
to pay a visit this web page, it contains valuable
Information.
How big are the 6 pieces of paper needed?
You toats like rock at the 3D snowflakes . I love your ideas they are so great that i just want to go and make my own website. halare right i am like going cra cra cra crazy. you should put one of my ideas like text me back on my computer .
OMG! That was super easy , thanks.
These are awesome. I linked to them in my post today! Thanks for sharing such great pictures on how to make them!
how do you stick it together
i like this idea no i love this idea its the best!
My daughter’s preschool has these hanging up all over! I thought it was the coolest thing! I had no idea how to make them! Thanks!
I have always thought around snowfalke in such a form it is a difficult thing for doing, but I see for your children it is so simple. Thanks you for the tutorial, I already know what tomorrow I will be doing with children:)
When you go shopping for toys, you may find many models of bird
toys available throughout Australia. With a lot of factors to take into consideration, choosing the proper toy of the educational, developing and learning nature is
really a very difficult job. Most powerful nerf pistol
After you wash them, a good idea would be to disinfect the sex toy.
Because each piece is individually made, the craftsman is in a position to control the
structure and building process, and also check for potential flaws in the toy.
These varieties of toys prepared from food submissions are offered
only ones through the ceremony later own toys prepared from wooden things, cotton etc.
And by far the most basic tip off when discovering fake luxury watches is the fact that
if it’s too good to become true, it in all probability is.
They really are a specimen of precision engineering and
high skilled craftsmanship. Omega copy Although this may
‘t be viewed too favorably in the seller’s viewpoint,
you would like to be safe than sorry.
This brand would have been a nice watch to possess and
began the Skagen big faced time pieces ( line.
Half form, half function, this watch puts style right in your
fingertips, thanks to some round black metal and rubber case that displays a silver-tone
and black bezel.
Great article! I loved the insight and advice given. Further, your blogging style is very fun to read. If you have enough time please explore my brand new blog and let me know what you think
THanks 3D Snowflakes Gingerbread Houses & Christmas Tree Cones Neighbor Gifts Kissletoe
This week we tackled snowflake crafts and were thrilled to master the art of making the 3D Paper Snowflake. 3D Paper Snowflakes look super cool and are actually quite simple for children to make with the help of an adult onc
That is not a YODA Snowflake!
I just saw these and hey are so beautiful! I really like the white but I bet glitter would really set them off. I am wondering if they could be made into pinwheels for summer?
I’ve recently started a site, and the information you offer on this website has helped me a lot. Thank you for all of your time & work.
at the same time. Long ago people just divided the time into days, months, and years. There are some calendars that are basically based on the movement of the moon. Some calendars are based on the position of the sun. There are some other calendars that are based on the position of both sun and moon.
Though the only thing which might work for you is a legitimate & active Netflix account login and passwords. Moreover, this would even keep you away from harmful and malicious programs which you might encounter on your hunt, that usually ends up messing up things for you eventually.
Gold is one of the important and natural sources available on the planet. In order to understand how the gold market determines the price of gold or Today Gold Rate, we have to first dismiss the principle of supply and demand . The supply and demand forces are the factors that define Today Gold Rate, they do not factor all that much over the long term.
home indicator, and rounded corners. Now since the latest phone is connected with the Gmail.com signup app with the other email service providers, it slowly is expected to roll up with other devices as wel
The Specific Identification number or we can say credentials will help you to login to the portal to access various sections which are available for each and every employee. The employee portal management system by Myloweslife is quite useful for everyone who is engaged with this system.
The Specific Identification number or my lowes life we can say credentials will help you to login to the portal to access various sections which are available for each and every employee. The employee portal management system by myloweslife is quite useful for everyone who is engaged with this system
This Free iOS Emulator works with Internet which means, to run this Best iOS Emulator For Windows PC, you need to have proper Internet connectivity. This is basically an app which can be installed on various devices such as Mac, Windows, Android etc. It runs smoothly and lets you test out various applications easily.This is one among the 10 Best iOS Emulator